
Lotus Marques received an email from Gordon Turner in Sydney asking for technical assistance regarding the correct orientation of the distributor, cap and HT leads on his Lotus Twin Cam Europa.
This was an interesting request as our experience shows that so many folk struggle in getting the orientation right.
The Lotus workshop manual has a description in Section M – Electrical Equipment, page 46.
However, this description makes several assumptions and maybe misleading if certain checks are not carried out.
If the engine has been recently been rebuilt by someone that is not familiar with the Lotus Twin Cam engine, then it is recommended that the camshaft timing be checked.
There is absolutely no point in trying to set the ignition timing if the camshaft timing is not correct.
The engine may start and run but will never operate correctly until the valve timing is set accurately.
Once the valve timing has been established as being correct, the distributor can be installed and the ignition timing be adjusted using the following method.
Rotate the crankshaft so the piston in number one cylinder is on the compression stroke and is approaching Top Dead Centre as indicated on the timing chest.
To save time, the valve timing and piston position can be checked without removing the cam cover.
Simply remove the oil filler cap and make sure the exhaust camshaft lobe on number four cylinder is pointing inwards towards number four cylinder spark plug.
If the lobe is observed in the correct position, then the camshaft lobes on number one cylinder will be pointing away from the sparkplug located in number one cylinder.
This is the correct valve timing position to set the distributor timing.
The static ignition timing for the particular engine being worked on should be checked in the workshop manual.
For example if the engine is domestic Big Valve engine fitted with Dellorto carburettors then the correct ignition timing is 12 degrees Before Top Dead Centre.
Subsequently the crankshaft pulley timing mark should be turned so it is in alignment with the 12 degree mark on the timing chest.
With the distributor cap removed, rotor arm installed and the clamp fitted to the body, the distributor can be inserted into the hole in the cylinder block.
The following extract from the Lotus workshop manual provides an excellent description in accomplishing this-
“Fit the distributor with the low tension terminal adjacent to the cylinder block.
Position the rotor arm, with the electrode towards the distributor car rear clip, prior to inserting the distributor into the cylinder block.
As the gears mesh the rotor will rotate clockwise into alignment with No.1 H.T. electrode in the distributor cap.”
To summarise the above instructions – If you stand facing the inlet side of the engine and look at the distributor orientation (once it is fully located) the low tension lead should be seen at exiting the body at 12 O’clock.
The rotor arm should be pointing at 10 O’clock.
“Slacken the bolt and twist the clamp so that the hole is in line with the one in the cylinder block. Fit the retaining bolt and tighten.”
This instruction ensures the distributor is located and can be secured correctly.
At this point it is recommended that the HT lead orientation be checked.
So with the rotor arm pointing approximately at 10 O’clock, this position indicates that the mating lead in the cap should be connected to No.1 spark plug lead. The direction of rotation for the distributor rotor arm is anti-clockwise.
With a firing order of 1-3-4-2, the next position at 8 O’clock indicates the mating lead in the cap should be connected to No.3 spark plug lead.
The next position at 4 O’clock indicates the mating lead in the cap should be connected to No.4 spark plug lead.
The last position at 2 O’clock indicates the mating lead in the cap should be connected to No.2 spark plug lead.
The next step is to install the distributor cap and this should be fastened in place with the locking clips located at 9 O’clock and 3 O’clock.
The ignition timing can be set quite accurately by the following steps -
1. Turn the distributor body anti-clockwise by approximately 10 to 15 degrees.
2. Remove the coil HT lead and place near a good earth point.
3. Turn the ignition on.
4. Grasp the distributor body and gently turn in a clockwise direction
5. Turn the distributor until you hear a click which is the result of the points opening and the coil delivering a spark to the HT lead.
6. At this point stop turning the distributor body and then tighten the clamp screw.
7. Turn off the ignition and reconnect the coil HT lead.
8. The ignition timing is now set so the engine can be started.
This simplified procedure setting static timing applies to both points and electronic ignition when fitted.
Later, connect a timing light and check the static timing is correct and the advance figure at 2500rpm is per the workshop manual.
Note. If the distributor body is orientated correctly and you have the correct distributor cap, the spark plug leads should exit the cap towards rear of the engine.
This was an interesting request as our experience shows that so many folk struggle in getting the orientation right.
The Lotus workshop manual has a description in Section M – Electrical Equipment, page 46.
However, this description makes several assumptions and maybe misleading if certain checks are not carried out.
If the engine has been recently been rebuilt by someone that is not familiar with the Lotus Twin Cam engine, then it is recommended that the camshaft timing be checked.
There is absolutely no point in trying to set the ignition timing if the camshaft timing is not correct.
The engine may start and run but will never operate correctly until the valve timing is set accurately.
Once the valve timing has been established as being correct, the distributor can be installed and the ignition timing be adjusted using the following method.
Rotate the crankshaft so the piston in number one cylinder is on the compression stroke and is approaching Top Dead Centre as indicated on the timing chest.
To save time, the valve timing and piston position can be checked without removing the cam cover.
Simply remove the oil filler cap and make sure the exhaust camshaft lobe on number four cylinder is pointing inwards towards number four cylinder spark plug.
If the lobe is observed in the correct position, then the camshaft lobes on number one cylinder will be pointing away from the sparkplug located in number one cylinder.
This is the correct valve timing position to set the distributor timing.
The static ignition timing for the particular engine being worked on should be checked in the workshop manual.
For example if the engine is domestic Big Valve engine fitted with Dellorto carburettors then the correct ignition timing is 12 degrees Before Top Dead Centre.
Subsequently the crankshaft pulley timing mark should be turned so it is in alignment with the 12 degree mark on the timing chest.
With the distributor cap removed, rotor arm installed and the clamp fitted to the body, the distributor can be inserted into the hole in the cylinder block.
The following extract from the Lotus workshop manual provides an excellent description in accomplishing this-
“Fit the distributor with the low tension terminal adjacent to the cylinder block.
Position the rotor arm, with the electrode towards the distributor car rear clip, prior to inserting the distributor into the cylinder block.
As the gears mesh the rotor will rotate clockwise into alignment with No.1 H.T. electrode in the distributor cap.”
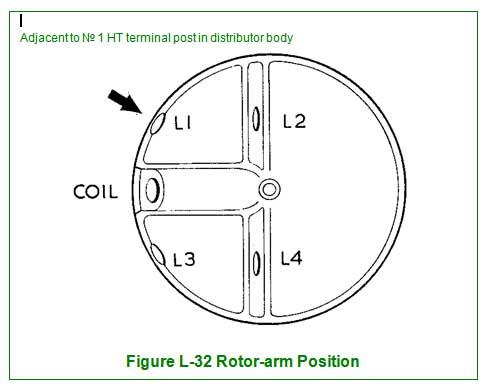
To summarise the above instructions – If you stand facing the inlet side of the engine and look at the distributor orientation (once it is fully located) the low tension lead should be seen at exiting the body at 12 O’clock.
The rotor arm should be pointing at 10 O’clock.
“Slacken the bolt and twist the clamp so that the hole is in line with the one in the cylinder block. Fit the retaining bolt and tighten.”
This instruction ensures the distributor is located and can be secured correctly.
At this point it is recommended that the HT lead orientation be checked.
So with the rotor arm pointing approximately at 10 O’clock, this position indicates that the mating lead in the cap should be connected to No.1 spark plug lead. The direction of rotation for the distributor rotor arm is anti-clockwise.
With a firing order of 1-3-4-2, the next position at 8 O’clock indicates the mating lead in the cap should be connected to No.3 spark plug lead.
The next position at 4 O’clock indicates the mating lead in the cap should be connected to No.4 spark plug lead.
The last position at 2 O’clock indicates the mating lead in the cap should be connected to No.2 spark plug lead.
The next step is to install the distributor cap and this should be fastened in place with the locking clips located at 9 O’clock and 3 O’clock.
The ignition timing can be set quite accurately by the following steps -
1. Turn the distributor body anti-clockwise by approximately 10 to 15 degrees.
2. Remove the coil HT lead and place near a good earth point.
3. Turn the ignition on.
4. Grasp the distributor body and gently turn in a clockwise direction
5. Turn the distributor until you hear a click which is the result of the points opening and the coil delivering a spark to the HT lead.
6. At this point stop turning the distributor body and then tighten the clamp screw.
7. Turn off the ignition and reconnect the coil HT lead.
8. The ignition timing is now set so the engine can be started.
This simplified procedure setting static timing applies to both points and electronic ignition when fitted.
Later, connect a timing light and check the static timing is correct and the advance figure at 2500rpm is per the workshop manual.
Note. If the distributor body is orientated correctly and you have the correct distributor cap, the spark plug leads should exit the cap towards rear of the engine.