
CLUTCH MASTER CYLINDER OVERHAUL GUIDE
Proceed as follows:
Drain the hydraulic fluid through the clutch slave cylinder bleed nipple.
Pull back the rubber dust excluder and withdraw the clevis pin securing the push rod to the pedal.
Un-couple the hydraulic pipe from the master cylinder.
Remove the bolts from the master cylinder mounting flange and withdraw the unit from the bulkhead.

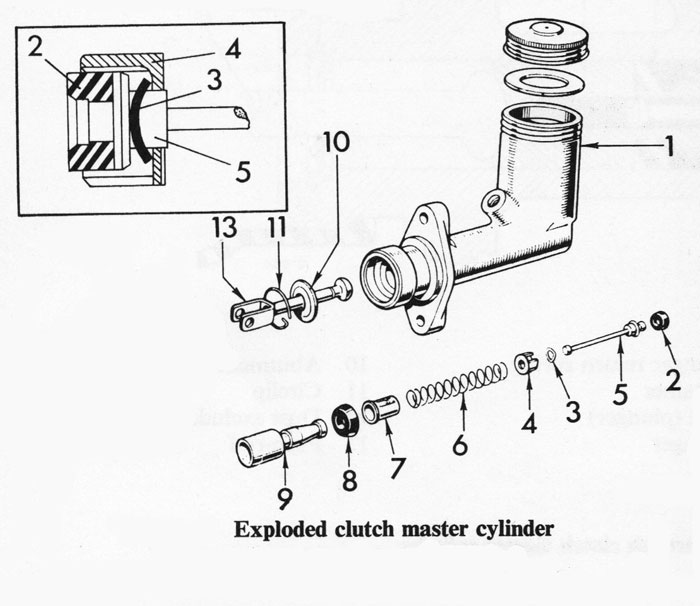
To dismantle
Depress the push rod (13), remove the circlip (11) and withdraw the push rod together with items (10) and (11).
Shake out the plunger, spring and valve assembly.
If necessary, apply a low pressure air line to the outlet union to eject the assembly.
Lift the clip on the spring retainer (7) and remove the retainer from the plunger (9) with the valve and spring assembly.
Detach the valve shank (5) by passing it through the offset hole in the retainer (7).
Re-move the spring (6.), distance piece (4) and spring (3) from the valve shank (5).
Detach the seal (2) from the valve shank (5) and the seal (8) from the plunger (9).
Inspection
Clean all the components with an approved cleaning fluid, examine for deterioration and renew as necessary.
To re-assemble
Fit new seals (8) and (2) to items (9) and (5).
Assemble the spring (3), distance piece (4), spring (6) and retainer (7) to the valve shank (5).
Attach the assembly to the plunger (9), lubricate with unused hydraulic fluid and fit into the master cylinder bore.
Refit the push rod (13) with abutment plate (10) and circlip (11).
To reinstall
Reverse the removal operations, refill with hydraulic fluid and bleed the system.
Proceed as follows:
Drain the hydraulic fluid through the clutch slave cylinder bleed nipple.
Pull back the rubber dust excluder and withdraw the clevis pin securing the push rod to the pedal.
Un-couple the hydraulic pipe from the master cylinder.
Remove the bolts from the master cylinder mounting flange and withdraw the unit from the bulkhead.
To dismantle
Depress the push rod (13), remove the circlip (11) and withdraw the push rod together with items (10) and (11).
Shake out the plunger, spring and valve assembly.
If necessary, apply a low pressure air line to the outlet union to eject the assembly.
Lift the clip on the spring retainer (7) and remove the retainer from the plunger (9) with the valve and spring assembly.
Detach the valve shank (5) by passing it through the offset hole in the retainer (7).
Re-move the spring (6.), distance piece (4) and spring (3) from the valve shank (5).
Detach the seal (2) from the valve shank (5) and the seal (8) from the plunger (9).
Inspection
Clean all the components with an approved cleaning fluid, examine for deterioration and renew as necessary.
To re-assemble
Fit new seals (8) and (2) to items (9) and (5).
Assemble the spring (3), distance piece (4), spring (6) and retainer (7) to the valve shank (5).
Attach the assembly to the plunger (9), lubricate with unused hydraulic fluid and fit into the master cylinder bore.
Refit the push rod (13) with abutment plate (10) and circlip (11).
To reinstall
Reverse the removal operations, refill with hydraulic fluid and bleed the system.