How to set up a Water Pump Efficiency Test
Step 1.
Locate the heater return hose that enters the suction side of the water pump.
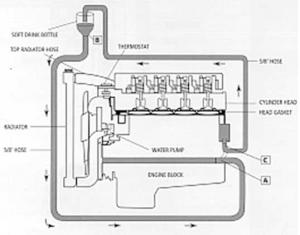
Remove the heater hose from the heater core. (See diagram, Point A) and join I metre of 5/8” internal diameter hose onto the pump end.
Note: Some vehicles may have an extended metal pipe from the water pump. You may need to locate hose section closer to the firewall.
Step 2.
Obtain a 1.25 Litre plastic soft drink bottle, cut off the bottom (retain the main body and neck)
Pierce a hole on either side of the base of the bottle and loop some wire through the holes to create a handle.
Push the free end of the hose that is attached to the suction side of the pump onto the neck of the bottle. (See diagram. Point B)
Hook the bottle on to the bonnet catch.
Step 3.
Join an extra length of hose onto the heater core outlet that previously ran to the pump (See diagram, Point C) and put this hose into the top of the bottle.
You have now created a loop for the coolant to flow.
Step 4.
Fill the bottle with water, burp the cooling system until the level of coolant in the bottle remains constant and is not draining out.
Step 5.
If the engine is fitted with a heater tap, ensure the tap or dash control is in the “on” position.
Step 6.
Start the engine and continue to top up the bottle with water until the trapped air pockets are purged and you again achieve a constant level of coolant.
Allow the engine to reach normal operating temperature before carrying out any tests.
How to test for Water Pump Pressure
Allow the engine to reach normal operating temperature and carry out the test with the engine running at idle.
Gradually raise the delivery tube above the bottle while allowing the coolant flow to fall into the bottle, until such time the coolant stops flowing.
At this point measure the distance between the coolant level in the bottle and the hose.
This measurement is the indicator of water pump performance:
• At a distance of 400mm to 600mm the pump pressure is approximately 1.0psi (Pounds Per Square Inch)
• At a distance of 300mm to 400mm the pump’s performance is marginal and will require checking again at the next service.
• At a distance of 100mm to 300mm the pump is inefficient and should be replaced with a new or modified pump that has been designed to deliver the required pump pressure
How to test for Pump Generated Cavitation
This test should be carried out with the engine running at approximately 2000rpm.
Maintain the engine revs at 2000rpm and look at the following changes in the coolant that is in the bottle.
Clouding – The coolant may become opaque or cloudy in appearance.
The fine bubbles that are generated by the pump cause the coolant to be aerated.
The bubbles will appear to be similar to those in a glass of beer as it is being poured.
Ultimately the coolant will start to produce a layer of foam in the bottle.
Intermittent Bubbling – The coolant may produce larger bubbles that move through the liquid in spurts similar to the bubbles generated by a fish tank aeration unit.
If either of the above condition occurs, whilst the engine is running at 2000rpm, it is a clear indication that the water pump is cavitating and not efficiently circulating the water through the cooling system.
To avoid any further damage to the cylinder head, the pump should be replaced with a new or modified pump that has been audited.
Note: A new after-market or genuine water pump may not solve your vehicles current problem and should be tested in the same manner described above before the vehicle leaves the workshop.
Step 1.
Locate the heater return hose that enters the suction side of the water pump.
Remove the heater hose from the heater core. (See diagram, Point A) and join I metre of 5/8” internal diameter hose onto the pump end.
Note: Some vehicles may have an extended metal pipe from the water pump. You may need to locate hose section closer to the firewall.
Step 2.
Obtain a 1.25 Litre plastic soft drink bottle, cut off the bottom (retain the main body and neck)
Pierce a hole on either side of the base of the bottle and loop some wire through the holes to create a handle.
Push the free end of the hose that is attached to the suction side of the pump onto the neck of the bottle. (See diagram. Point B)
Hook the bottle on to the bonnet catch.
Step 3.
Join an extra length of hose onto the heater core outlet that previously ran to the pump (See diagram, Point C) and put this hose into the top of the bottle.
You have now created a loop for the coolant to flow.
Step 4.
Fill the bottle with water, burp the cooling system until the level of coolant in the bottle remains constant and is not draining out.
Step 5.
If the engine is fitted with a heater tap, ensure the tap or dash control is in the “on” position.
Step 6.
Start the engine and continue to top up the bottle with water until the trapped air pockets are purged and you again achieve a constant level of coolant.
Allow the engine to reach normal operating temperature before carrying out any tests.
How to test for Water Pump Pressure

Allow the engine to reach normal operating temperature and carry out the test with the engine running at idle.
Gradually raise the delivery tube above the bottle while allowing the coolant flow to fall into the bottle, until such time the coolant stops flowing.
At this point measure the distance between the coolant level in the bottle and the hose.
This measurement is the indicator of water pump performance:
• At a distance of 400mm to 600mm the pump pressure is approximately 1.0psi (Pounds Per Square Inch)
• At a distance of 300mm to 400mm the pump’s performance is marginal and will require checking again at the next service.
• At a distance of 100mm to 300mm the pump is inefficient and should be replaced with a new or modified pump that has been designed to deliver the required pump pressure
How to test for Pump Generated Cavitation
This test should be carried out with the engine running at approximately 2000rpm.
Maintain the engine revs at 2000rpm and look at the following changes in the coolant that is in the bottle.
Clouding – The coolant may become opaque or cloudy in appearance.
The fine bubbles that are generated by the pump cause the coolant to be aerated.
The bubbles will appear to be similar to those in a glass of beer as it is being poured.
Ultimately the coolant will start to produce a layer of foam in the bottle.
Intermittent Bubbling – The coolant may produce larger bubbles that move through the liquid in spurts similar to the bubbles generated by a fish tank aeration unit.
If either of the above condition occurs, whilst the engine is running at 2000rpm, it is a clear indication that the water pump is cavitating and not efficiently circulating the water through the cooling system.
To avoid any further damage to the cylinder head, the pump should be replaced with a new or modified pump that has been audited.
Note: A new after-market or genuine water pump may not solve your vehicles current problem and should be tested in the same manner described above before the vehicle leaves the workshop.